I must apologize for taking so long to get back to this blog. For the past two weeks it has been absolutely crazy around the house. I will try to catch you up. Buckle up it is going to be a bumpy ride.
First, my husband was sick with a cold and a sinus infection. Then, just because he loves me so much and wanted to share, he gave it to me. I do believe it made me feel worse than I did when I had the flu. It took me out of the game for over a week. All I did was sleep. When I did wake up it was just to take more meds, get something to drink and then back to bed. I had to make a trip to the doctor to get antibiotics to get over it. It was yucky!
I am not sure what the weather has been like where you are, but here in Gadsden, Alabama, it has been manic. It will be nice and fairly warm one day, and then it will go down to single digits and water pipes all over town will bust. Some businesses will be closed, schools will open late. It is really bad on those warm days when the pipes defrost and flood yards, or even worse when it busts inside and floods the rooms inside. My house has suffered with this problem too.
Twice in the past two weeks we have had water pipes freeze and bust. I have murdered three electric heaters so far this winter just trying to keep warm. So, it has thrown me behind on everything from cleaning to cooking to staying warm.
We have had to go Mom's to get showers and do laundry, just so we could have enough clean clothes to get us through the weekend while we tried to conquer these repairs. This weather has thrown a monkey wrench into everything.
When I heard the weather man predicting the coldest weather this upcoming week in the history of Alabama, I made the executive decision to do something about our situation. I was tired of not having water, of freezing, and dealing with a dirty house. Do we need to even discuss the fact that my power bill tripled from running electric heaters?
I planned to install propane heaters in the house and use this to heat with. Originally the plan was to install two propane burning heaters in the house. One in the kitchen and one in the living room. We had to get the water pipes fixed and do some weather proofing. Plus, I wanted to put the bedroom into what is now the living room to try to cut down on the square footage we were trying to heat.
Saturday morning we planned to go to storage, get our propane heaters out, the 2 -100 pound tanks, mounting brackets, etc, and go fill up the tanks at a local gas dealer . Go by Lowe's and get our copper pipe, fittings, and supplies and have heat by the evening. In the meantime, hopefully our pipes would defrost and we could take care of the water repairs after we got the heaters installed.
Wouldn't you know it, nothing ever works as planned. We head over to Mom's for a shower before we get started & to get my Dad to help us with the installation of the heaters. For those of you that can afford it, go ahead and call a plumber for the water pipes and the gas company to run lines. In my case, we cannot afford that so we call someone older and wiser than we are on the subject. Especially, when it comes to things that can be very dangerous (such as propane or electrical problems).
Dad & I are getting ready to leave to go do the shopping, while my husband grabbed the gas tanks to go have them filled. We decided to divide and conquer to get everything knocked out quicker.
Before Dad & I could leave, I got a call from work and had to drop everything I was working on to run deal with a problem there. Thankfully, it did not take but about an hour and soon I was back on track to getting things done, back to the house to get Dad and on to Lowe's. I spent over $120.00 buying things to get the heater installed and weatherproofing materials.
Of course, they didn't have a lot of things we needed. They were sold out because it seemed that everyone in town had the same idea that I had. On our way to the car to leave, we were planning our next stop to pick up the remaining items we needed when his phone rang. It was Mom, they had a leak at their house and it was flooding the yard. So I had to rush him back home so he could try to repair his water problems. He was hoping it would be a quick fix, but of course it wasn't. It took him until dark to get it fixed. This put installing my heaters on the back burner. My uncle was going to help my Dad work on his busted water pipes. So, I was free to move on to the next challenge.
In the meantime, my husband had been to have the tanks filled only to discover that our tanks were out dated and would have to be sent off for 4 - 6 weeks to be retrofitted. This was going to cost us an additional $40.00 per tank. We had to have heat, and buying a new tank was not in the budget, but he went to the bank, did a little juggling and managed to get a small personal loan just in time to get to the only store in town that was open that sold the tanks and get it back to the gas company 10 minutes before they closed.
My husband and I decided to meet up and go out together to see if we could go to the other stores to find the remaining items we needed to get the heater installed and try to find the things we needed to fix our water pipes. After hitting two more home improvement stores to try to find all we needed, we finally were able to go back home. He tracked down the leak and started to work on it. I started inside the house trying to clean up and straighten up so that they would have plenty of room to install the heaters the next morning. By this time, it was dark and I knew that getting heaters intalled was not going to be feasible. It would have to wait until the next day.
It wasn't long after we got home until Robby (my hubby) was able to get the water leak fixed. We were happy! We had water again! YAY! Then, it wasn't long until we discovered that the toilet was running nonstop and every time we turned the water on in the kitchen the spray nozzle spritzed water all over the counter and whoever happened to be in front of the sink. Almost every occassion it was me. Oh goodie! More repairs demanding attention and requiring money we had not budgeted for. Stress and frustration mounted by the second. Robby calmed me down a little by reminding me that he had borrowed a little from the bank, and still had some left so we would be ok. These problems would just have to wait (like the installation of the heaters) until Sunday. I gave up. I went to bed and prayed that Sunday would be a better day.
Monday, January 27, 2014
Friday, January 17, 2014
Make Your Own Instant Oatmeal and Save Money!
Make your own instant oatmeal!

Use a cannister of quick oats. Measure out 1/4 cup of oats into snack size bags. Grab a pack in the morning and treat it the same way you would instant oatmeal. Add water to a bowl and pour in the quick oats. Pop it in the microwave for about 2 minutes and Voila! Your breakfast will be ready before you have had time to get dressed in the morning.
My cannister of quick oats yielded 22 bags and cost me about $2.00 including the bags. This equaled out to around $0.09 per bag

I was very proud of myself a couple of weeks ago. I thought I was saving quite a bit of money (and even bragged in a blog about it) by having my instant oatmeal for breakfast. I thought I was doing awesome by cutting my breakfast budget down below $0.25 until, my daughter showed me this trick.
I eat oatmeal 4-5 times a week for breakfast. It's nutritious, low in calories and low in cost.
This trick of my daughter's is going to save me quite a bit over time. I just had to pass along this helpful hint.
Thursday, January 16, 2014
Laundry Tip: Make Liquid Fabric Softener Last Longer
I have just the solution for you! This simple tip will make any liquid fabric softener last at least 4 times longer and your clothes will still have that same wonderful smell and no static electricity.
Buy yourself a couple of packs of sponges. I found mine at Dollar General for $2.00 each. While I was at it, I went ahead and bought a new bottle of liquid fabric softener for $3.00. (I don't typically use fabric softener because the powdered laundry soap I make has Purex Crystals in it, eliminating this need for me. But, it is nice to have on hand for if/when I decide to use it.)


When you start a load of laundry, use one small sponge per load. Squeeze out excess liquid and place in your washing machine with your dirty laundry. When the washing machine finishes, put laundry AND sponge into dryer. After dryer finishes, place small sponge back into the container to re-use.
Eventually, the liquid fabric softener will be used, just refill container with fabric softener remaining in original bottle. You will be so surprised at how much longer this will make one bottle of fabric softener last!
My bottle stated that it was a 40 load bottle (which would last me about a month if I followed the instructions on the bottle). I only used 3/4 of the bottle filling my container. I had 52 sponges to start off. They will be recycled over and over again. I am predicting this one 40 load bottle will last me around 6 months, if I wash on average one - two loads of clothes per day.
Wednesday, January 15, 2014
Easy Way to Keep Your Shower Clean

Open it and pour two tablespoons of dishwashing liquid in. Fill the remainder with vinegar.
This is what it will look like once you have finished filling it.

Tuesday, January 14, 2014
How to Clean Your Stove Top For Less Than $1.00
I have one of the oldest (& dirtiest) stoves known to mankind. It is so disgusting that I have been threatening to trade it in on a new one! (I just can't afford it yet!) I have to make do with it. I am just tired of it looking like I pulled it out of the county dump. I have tried all sorts of cleansers and nothing really works. Oh, it might take off a little, but nothing like I want it to. I have even tried Easy Off oven cleaner with no success. I thought after my success with the oven, I would try to tackle this.

Believe it or not, I actually washed over it with hot, soapy water just before I took this picture. I am so embarrased but before I show you the after photo, I wanted you to see what it looked like before.
The first thing I tried was a paste made with baking soda and peroxide.


It definitely looked better. You can tell it worked. My stove top was just so bad, that it would not get it all. If your's is not as bad as mine was, this is probably all you need to get yours sparkling clean.
Because my stove was so stained and had at least 100 years (I may be slightly exaggerating, but it certainly felt like it as I was cleaning it) of grease built up on it, I had to keep trying.
I remembered the mixture I used to clean my oven, and thought about giving it a shot.
I brought a pot of water almost to a boil on the stove. I did this for two reasons. First to heat up the stove top, and second to get my water as hot as I could stand it.

I poured the hot water into a cleaning bucket and added two tablespoons of dishwashing liquid.

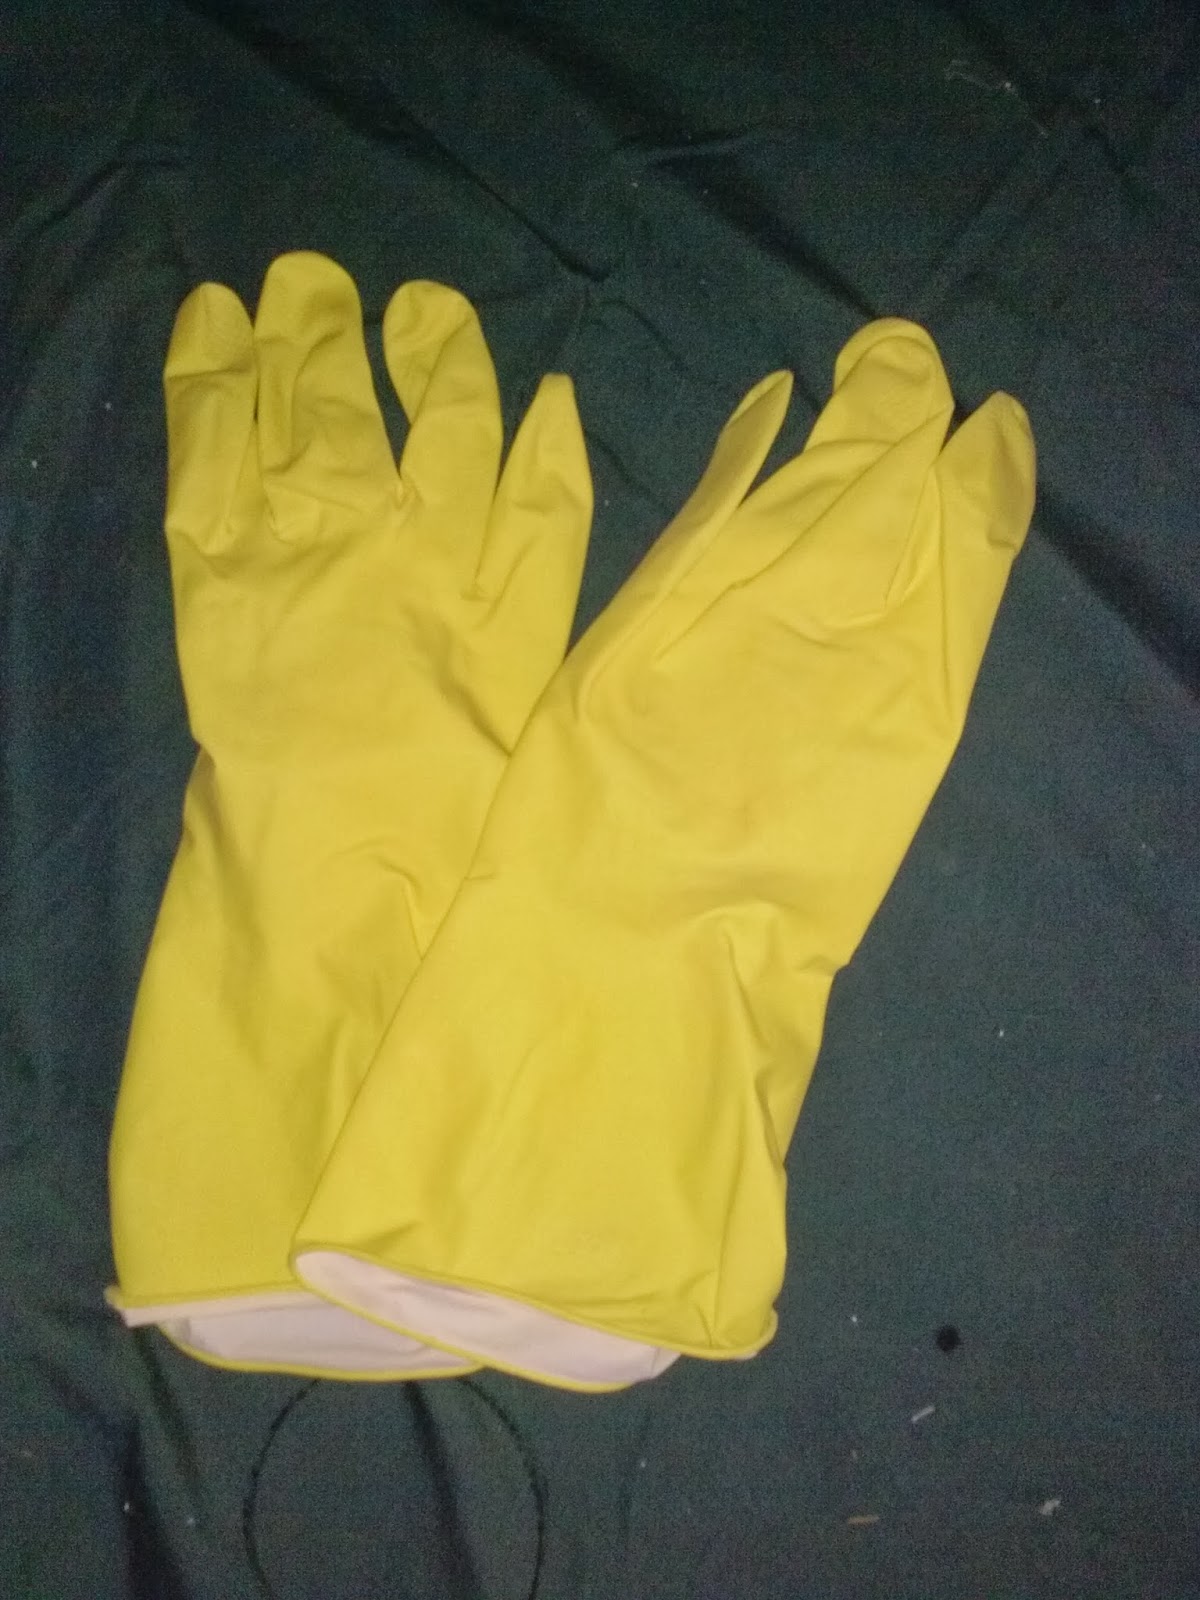
Pulled out my rubber gloves,


This is the final result.

Monday, January 13, 2014
How to Clean Your Oven for Less Than $1.00
I have an old second oven. I have tried everything to get it clean. No matter how hard I tried it just would not come clean. Until, I tried this simple solution. Here is the before shot. (Hanging my head in shame)

I started the cleaning process the night before. I put the oven on the lowest temperature setting. For my old oven, it was 200 F. While my oven was heating, I put a pot of water on the stove top to heat up. Make sure your pot does not have a plastic handle. You will be putting this in the oven.

The entire bottle of Ammonia was $1.99. I used only about 1/3 of the bottle.


I started the cleaning process the night before. I put the oven on the lowest temperature setting. For my old oven, it was 200 F. While my oven was heating, I put a pot of water on the stove top to heat up. Make sure your pot does not have a plastic handle. You will be putting this in the oven.

As the water was coming to a boil, I poured lemon scented Ammonia into another oven safe pot (around 1 1/2 cups).


When the water came to a roaring boil, I turned off the oven. Then, I placed the pan of boiling water on the bottom rack of my oven. I put the ammonia on the top rack. Closed the oven door and went to bed.
The next morning, I opened the oven door, let it air out for about 15 minutes, put the pot of water back to heating on the stove.
I removed the ammonia and set it to the side while I removed the oven racks.
Next I added, 2 tablespoons of dishwashing liquid to the ammonia.

Once the water was hot again, I poured it into a wash pan with the ammonia and dishwashing liquid mixture.
Next, I found my trusty rubber gloves. Please make sure you wear gloves if you try this. Ammonia can be harmful to your skin.
Now, it was time to start the cleaning. I used an old cut up bath towel to wipe out the oven with. There were some really bad places that I had to use a stainless steel scrubbie on. Once I had the oven as clean as I thought it would get it, I used fresh hot water and a clean cloth to rinse it.
Here is what the oven looks like now.

BIG difference from the before shot! (Grinning from ear to ear! So proud of myself!
Friday, January 10, 2014
Sandwich Bag Organizational & Storage Tip

To store those sandwich or storage bags out of the way and still keep them handy, use push pins to pin them onto the inside of a cabinet door. In this case, they were pinned to the inside of a pantry in a tiny space between the door frame and shelves. This idea will free up cabinet space for other items. Absolutely love this idea and it works great!
Tuesday, January 7, 2014
DIY Citrus Rosemary All Purpose Cleaner
Do you need a great all purpose cleaner to use around your house? I have an all natural cleaner for you. It only has 3 ingredients so it is simple and easy to make. You probably have all of the ingredients on hand, so why not give it a try?
Start off with oranges. I still had plenty on hand from the holidays. Instead of throwing those peels away, I had the family save them. I put those in a recycled plastic mayonnaise jar.

Orange peelings contain citrus essential oil which is a natural solvent. It will cut through grease and grime and is great to clean those really tough jobs, like the stove top.
I poured vinegar over the peels and this is what it looked like.

Vinegar is a natural bi-product of fruit, vegetables and grains. It kills bacteria, mold, and germ causing viruses.
I added a few sprigs of dried rosemary.

Rosemary is a natural disinfectant and a natural air freshener. As a bonus, the aroma is known to have properties that stimulates brain function that will aid in mental clarity and increased memory. It is also a stress reliever and promotes relaxation.
When the rosemary was added to the orange peel/vinegar mixture it looked like this.

The Citrus Rosemary Cleaner starter is now complete. All it needs is a label with date and time to wait.

Place the jar in some place out of the way. Let it steep for about 30 days. Shake the jar every few days to stir contents. Then, strain the liquid and pour into a spay bottle. Place rosemary and peelings back in the jar. Fill with vinegar to start your next batch of cleaner.
This cleaner is non-toxic, all natural, biodegradable, and environmentally friendly.
Start off with oranges. I still had plenty on hand from the holidays. Instead of throwing those peels away, I had the family save them. I put those in a recycled plastic mayonnaise jar.
Orange peelings contain citrus essential oil which is a natural solvent. It will cut through grease and grime and is great to clean those really tough jobs, like the stove top.
I poured vinegar over the peels and this is what it looked like.
Vinegar is a natural bi-product of fruit, vegetables and grains. It kills bacteria, mold, and germ causing viruses.
I added a few sprigs of dried rosemary.
Rosemary is a natural disinfectant and a natural air freshener. As a bonus, the aroma is known to have properties that stimulates brain function that will aid in mental clarity and increased memory. It is also a stress reliever and promotes relaxation.
When the rosemary was added to the orange peel/vinegar mixture it looked like this.
The Citrus Rosemary Cleaner starter is now complete. All it needs is a label with date and time to wait.
Place the jar in some place out of the way. Let it steep for about 30 days. Shake the jar every few days to stir contents. Then, strain the liquid and pour into a spay bottle. Place rosemary and peelings back in the jar. Fill with vinegar to start your next batch of cleaner.
This cleaner is non-toxic, all natural, biodegradable, and environmentally friendly.
Monday, January 6, 2014
Vertical Shower Organization Plus a Bonus Storage Solution
Do you have a lot of shampoo, conditioner, body wash etc., in your shower? If you are like me, I am forever knocking something over (hoping it doesn't spill when it crushes my toes). I have found out the hard way that yelling and saying things I shouldn't to those bottles does absolutely no good.
I have to give my Mom a 'that-a-girl'. She came up with this genius solution to the problem.
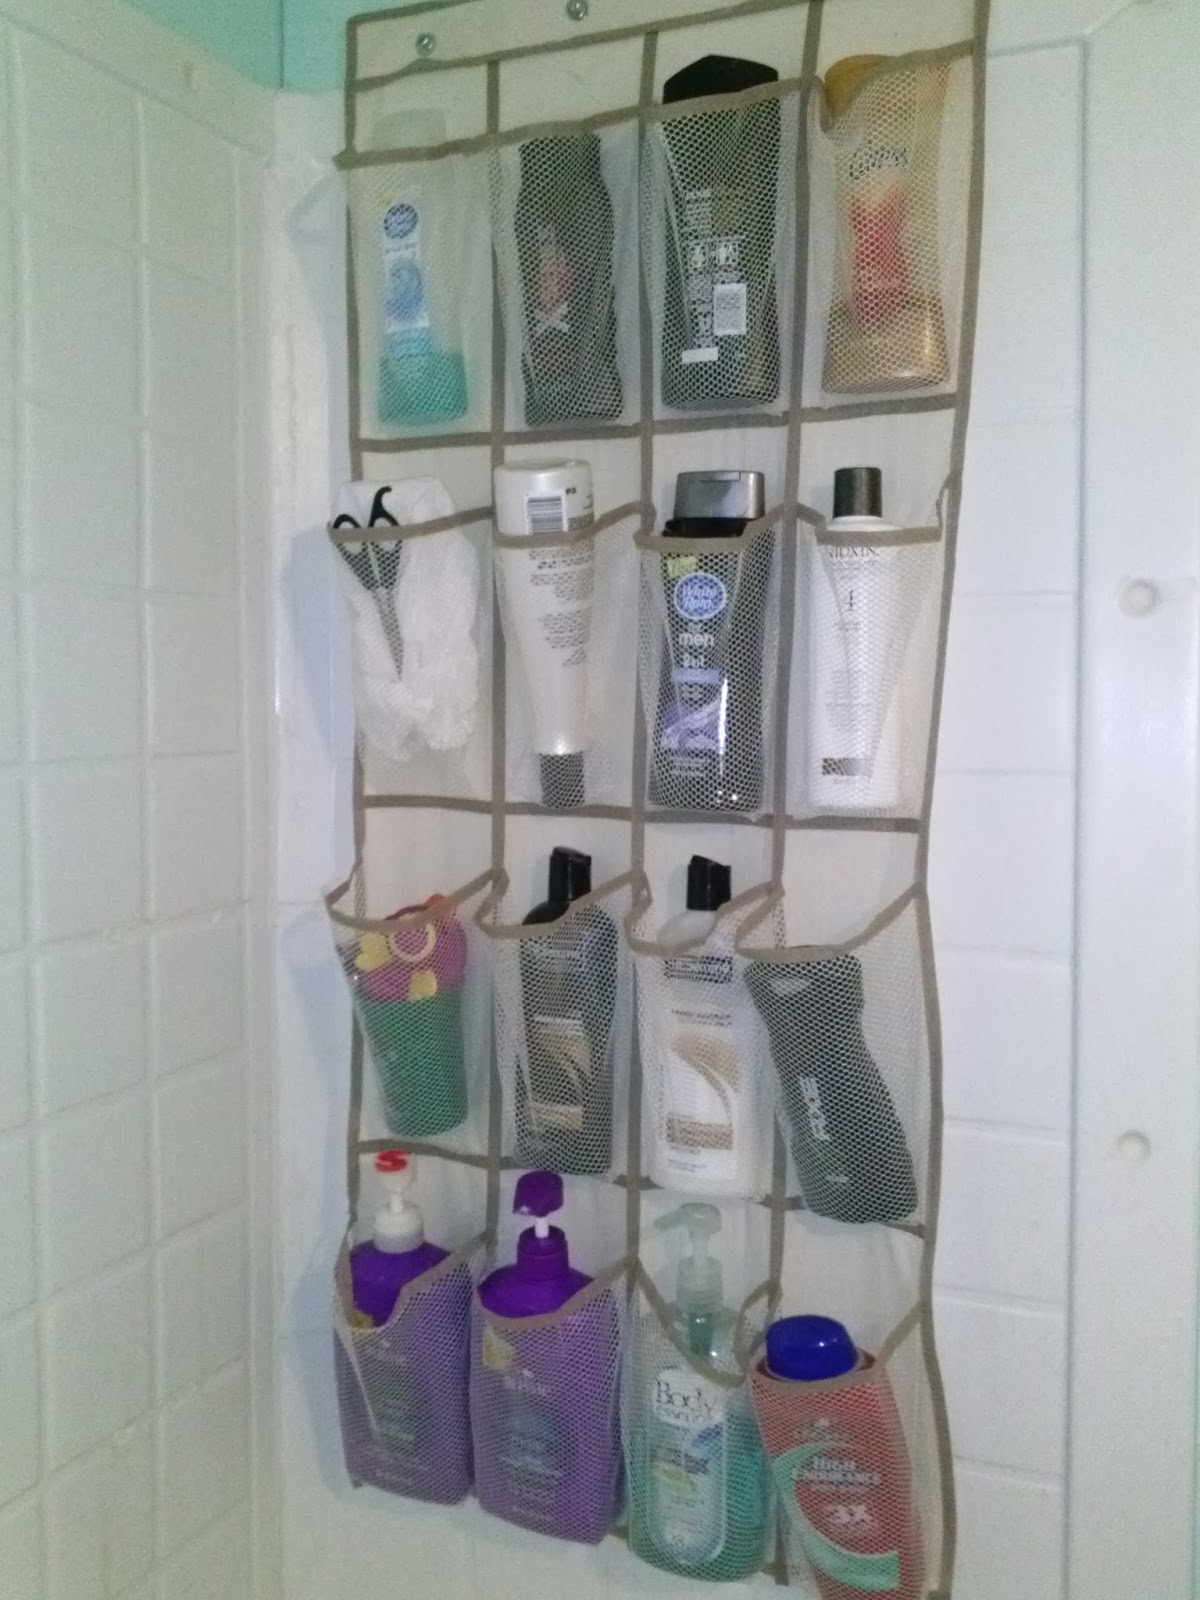
She tacked up a shoe organizer in the back of her shower. It cleared the edge of the tub of body washes and hair products. All of the bottles fit in it nicely and nothing can tip over and spill or fall and crush tender toes. She even has a place to store other things you might need in there as well. You are able to see each item through the mesh. This was a great idea, Mom!
When she measured it to see if it would fit, she discovered that it was too long. She cut off a couple of rows and turned the excess into a mail organizer.

This trick solved another organizational problem she had of sorting each person's mail without having stacks of mail all over the table. She attached it to the wall in the hallway across from the bathroom so each person that has mail is sure to see it. She used push pins to secure it to the wall.
This would be a great office organizer too!
Way to go Mom! Twice the organization out of one item!
I have to give my Mom a 'that-a-girl'. She came up with this genius solution to the problem.
She tacked up a shoe organizer in the back of her shower. It cleared the edge of the tub of body washes and hair products. All of the bottles fit in it nicely and nothing can tip over and spill or fall and crush tender toes. She even has a place to store other things you might need in there as well. You are able to see each item through the mesh. This was a great idea, Mom!
When she measured it to see if it would fit, she discovered that it was too long. She cut off a couple of rows and turned the excess into a mail organizer.
This trick solved another organizational problem she had of sorting each person's mail without having stacks of mail all over the table. She attached it to the wall in the hallway across from the bathroom so each person that has mail is sure to see it. She used push pins to secure it to the wall.
This would be a great office organizer too!
Way to go Mom! Twice the organization out of one item!
Sunday, January 5, 2014
DIY Laundry Pods
Do you go to a laundromat to do your laundry and hate carrying big bottles of soap and fabric softener? Or maybe you are going to be traveling and need to do laundry while you are away. I have a solution for you. Make these laundry pods and make your life a bit easier. These are simple to make and easy to carry.
They only have five ingredients and odds are you have most of it in your house now

Ingredients:
3 cups of Arm & Hammer Super Washing Soda
1 cup of Fels Naptha Bar Soap - shredded
4 tablespoons of Epsom Salt
6 tablespoons of hydrogen peroxide
1/2 cup of vinegar
Directions:
Add 1 cup of shredded Fels Naptha bar soap to a mixing bowl.

Then, add 3 cups of Arm & Hammer Super Washing Soda.

Next, add 4 tablespoons of Epsom Salt.

Then you will need to add 6 tablespoons of hydrogen peroxide. It will fizz and bubble. This is normal. Next, add 1/2 cup of vinegar and stir.

The mixture should have the texture of slightly wet sand.
Use a tablespoon measuring spoon to make scoops. Pull against side of bowl to remove excess from spoon. Place on a parchment covered tray or cookie sheet.

Allow pods to dry over night. Then, store in an airtight container. Will make about 40 laundry pods. Each pod costs only pennies to make and is safe in HE machines. No fabric softener is needed when you use these pods.
They only have five ingredients and odds are you have most of it in your house now
Ingredients:
3 cups of Arm & Hammer Super Washing Soda
1 cup of Fels Naptha Bar Soap - shredded
4 tablespoons of Epsom Salt
6 tablespoons of hydrogen peroxide
1/2 cup of vinegar
Directions:
Add 1 cup of shredded Fels Naptha bar soap to a mixing bowl.
Then, add 3 cups of Arm & Hammer Super Washing Soda.
Next, add 4 tablespoons of Epsom Salt.
Then you will need to add 6 tablespoons of hydrogen peroxide. It will fizz and bubble. This is normal. Next, add 1/2 cup of vinegar and stir.
The mixture should have the texture of slightly wet sand.
Use a tablespoon measuring spoon to make scoops. Pull against side of bowl to remove excess from spoon. Place on a parchment covered tray or cookie sheet.
Allow pods to dry over night. Then, store in an airtight container. Will make about 40 laundry pods. Each pod costs only pennies to make and is safe in HE machines. No fabric softener is needed when you use these pods.
DIY Laundry Soap Powdered
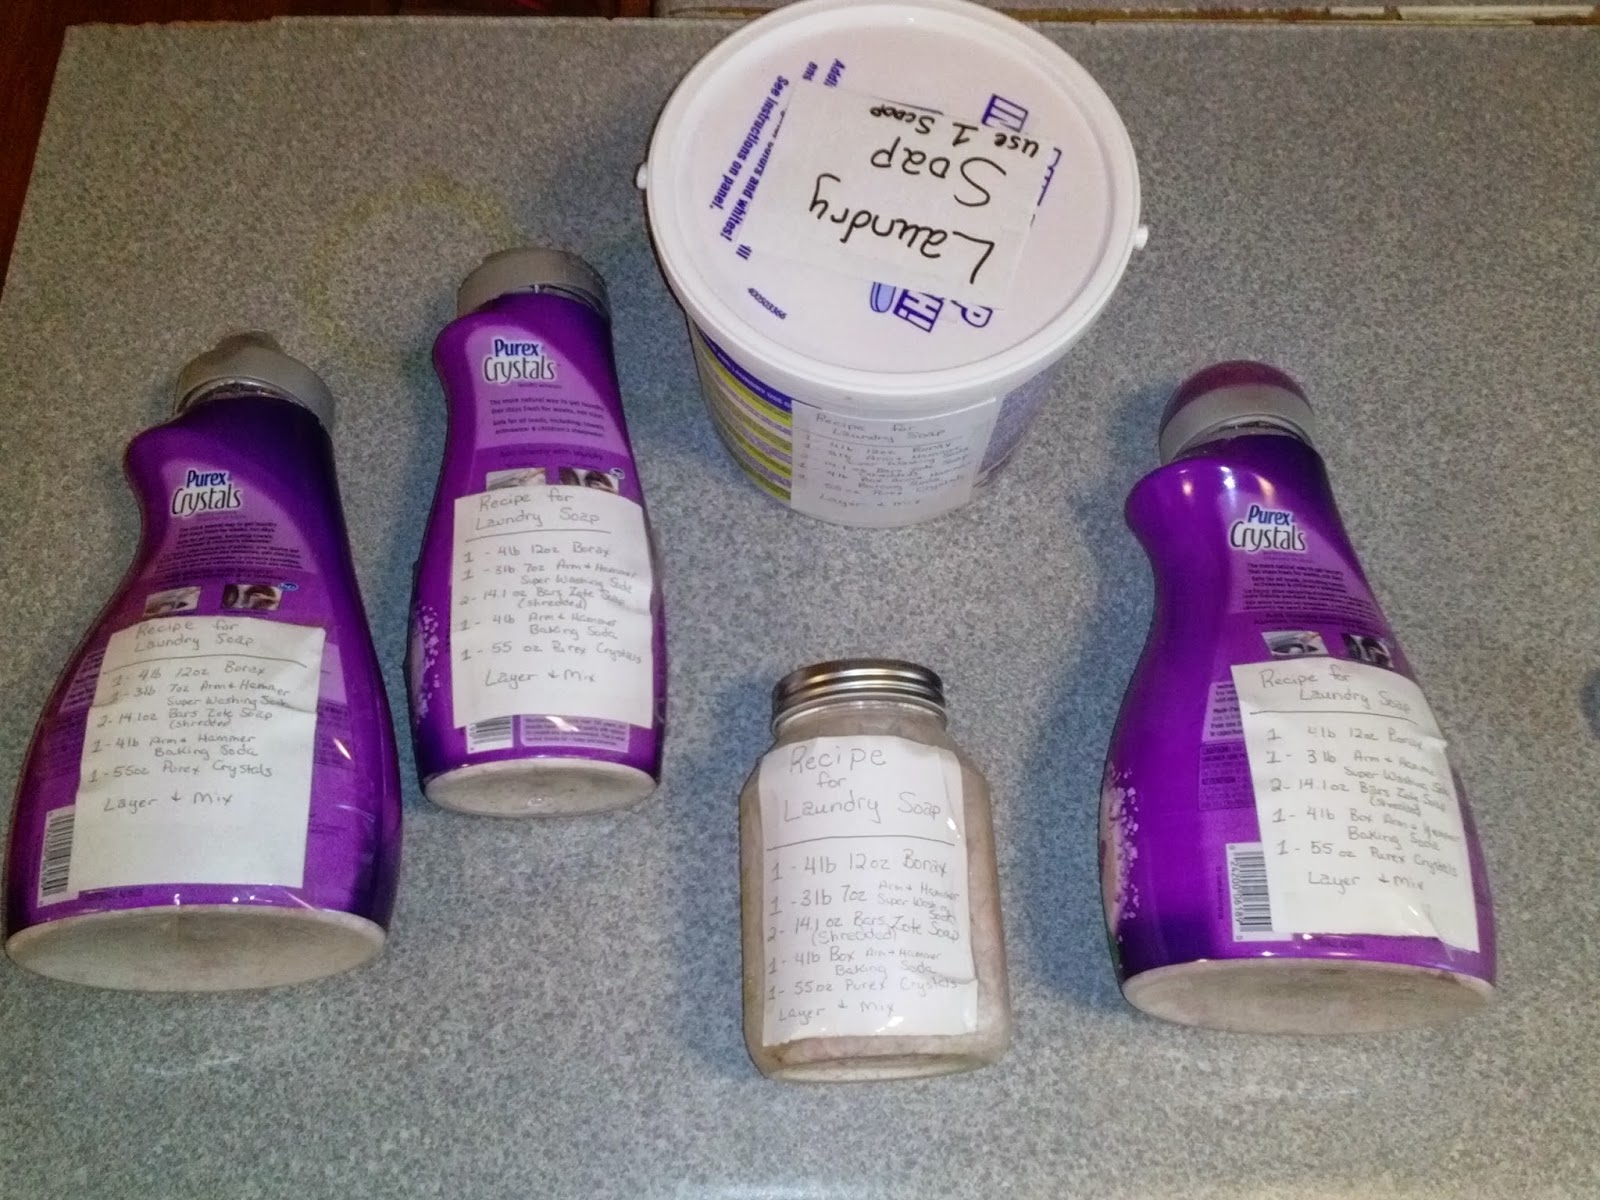
Tired of paying high prices for name brand laundry soap? Not me. I have been making my own for years. This is my favorite DIY powdered laundry soap. It makes enough to last for months and costs less than $21.00 total. You have to try this one!

You will need this for your ingredients:
1) 4 pound box of Borax ($3.38)
1) 3 pound 7 ounce box of Arm & Hammer Super Washing Soda ($3.24)
1) 3 pound container of Oxi Clean ($2.73)
2) 14.1 ounce bars of Zote Soap ($0.97 each)
1) 4 pound box of Arm & Hammer Baking Soda ($2.24)
1) 55 ounce bottle of Crystals Fabric Softener ($8.96)
All ingredients were purchased at Walmart in the laundry aisle.
The cost for everything was $20.55 before tax.
Directions:
Grate the Zote Soap. I used a food processor. You can grate it by hand, or slice it and put it in the microwave for about 30 seconds and crumble it. Do it anyway you want, I just found the food processor to be the quickest and easiest way. You want it to look like pink shredded cheese.
This is what it should look like after grating.

Next you will want to layer your ingredients. Think of making lasagna. Once you have used all your ingredients in the layering process, it will look like this.

Now it is time to mix all of the ingredients. You can do it the old fashioned way with a big spoon and stir until you feel like your arm will fall off.

Or you can do it the easy way by pouring it into a garbage bag and rolling it back and forth.


When you get it mixed well, fill your containers. I try to recycle my old ones by refilling them. I label the front with 'Laundry Soap' with directions on how to use.

I make a label with the ingredients for the back. This way, I know exactly how much and what types of ingredients are in it so I do not have to hunt for the recipe when I get ready to make more.

Now, how much to use per load? It only takes 2 tablespoons per load. I use the scoop that came in my oxi clean container. You can also use the lid from the Purex Crystals bottle. Fill to the middle line on the bottle lid.
 You will be surprised by how much this makes and by how little it takes per load. It should last 6 - 12 months depending on how big your family is and how much laundry is done each day in your home.
It is safe to use on HE machines.
To make it easier and more fun to make, get a laundry soap making buddy. In my case, I went to Mom's and we made 2 batches. This way she had one and I had one to take home. We spent the day together AND got something done! Yay us!
You will need this for your ingredients:
1) 4 pound box of Borax ($3.38)
1) 3 pound 7 ounce box of Arm & Hammer Super Washing Soda ($3.24)
1) 3 pound container of Oxi Clean ($2.73)
2) 14.1 ounce bars of Zote Soap ($0.97 each)
1) 4 pound box of Arm & Hammer Baking Soda ($2.24)
1) 55 ounce bottle of Crystals Fabric Softener ($8.96)
All ingredients were purchased at Walmart in the laundry aisle.
The cost for everything was $20.55 before tax.
Directions:
Grate the Zote Soap. I used a food processor. You can grate it by hand, or slice it and put it in the microwave for about 30 seconds and crumble it. Do it anyway you want, I just found the food processor to be the quickest and easiest way. You want it to look like pink shredded cheese.
This is what it should look like after grating.
Next you will want to layer your ingredients. Think of making lasagna. Once you have used all your ingredients in the layering process, it will look like this.
Now it is time to mix all of the ingredients. You can do it the old fashioned way with a big spoon and stir until you feel like your arm will fall off.
Or you can do it the easy way by pouring it into a garbage bag and rolling it back and forth.
When you get it mixed well, fill your containers. I try to recycle my old ones by refilling them. I label the front with 'Laundry Soap' with directions on how to use.
I make a label with the ingredients for the back. This way, I know exactly how much and what types of ingredients are in it so I do not have to hunt for the recipe when I get ready to make more.
Now, how much to use per load? It only takes 2 tablespoons per load. I use the scoop that came in my oxi clean container. You can also use the lid from the Purex Crystals bottle. Fill to the middle line on the bottle lid.
It is safe to use on HE machines.
To make it easier and more fun to make, get a laundry soap making buddy. In my case, I went to Mom's and we made 2 batches. This way she had one and I had one to take home. We spent the day together AND got something done! Yay us!
Christmas Clearance Sales 50% - 90% off
Now is the time to pick up those essentials you will need for the Christmas season next year. No one likes to miss out on a good deal. Now is the best time to buy decorations, ornaments, trees, wrapping paper, etc. for next Christmas.
Walmart has their Christmas merchandise marked 50% - 75% off. That sounds like a pretty good deal and you might want to pick up one of those big inflatables for the yard or a few artificial trees to decorate with. You may even find good deals on stockings or ornaments.
Target has their Holiday merchandise marked 75% - 90% off. I was able to score ornament hangers $0.10 for a pack of 100 and wrapping paper for $0.25 a roll. The shelves are beginning to look thin and the merchandise has been picked over, but you can still find some good buys. Don't forget to check other areas of the store. I found clearance merchandise in toys, pharmacy, grocery and clothing.
Publix has a table full of those edible goodies from Christmas marked 50% - 75% off. In my store, it was near the registers.
No matter where you shop, take advantage of these awesome sales. You can save your self quite a bit of money just buying and storing wrapping paper now for next Christmas. Think ahead - spend a little now to save a LOT later!
Saturday, January 4, 2014
Kitchen Tip - How to Easily Clean Cookware
Ever have one of those oops moments in the kitchen and burn your dinner? Or have a big pot cooking and your food sticks to the bottom? What do you do after you scrub and scrub and it still refuses to come clean? Don't throw it away. I have a much easier solution.
Cover the bottom of your pot with water, plus a couple of inches. You will want about 3-4 inches of water in the pan. Put it back on the stove and heat the water to the near boiling point. Turn off the heat and add 2 - 3 effervescent denture cleanser tablets of your choice (Efferdent, Fixodent or store brand). Let it sit over night. The next morning pour out the water mixture. Your cookware will be as good as new and ready for it's turn in the dishwasher. It is so easy! You will never scrub burnt on food from cookware again!
Cover the bottom of your pot with water, plus a couple of inches. You will want about 3-4 inches of water in the pan. Put it back on the stove and heat the water to the near boiling point. Turn off the heat and add 2 - 3 effervescent denture cleanser tablets of your choice (Efferdent, Fixodent or store brand). Let it sit over night. The next morning pour out the water mixture. Your cookware will be as good as new and ready for it's turn in the dishwasher. It is so easy! You will never scrub burnt on food from cookware again!
Friday, January 3, 2014
A Cheap, Quick, & Healthy Breakfast Choice
Was your New Year's resolution to save money? or maybe it was to lose weight? I have a simple breakfast idea that is healthy, quick, easy, very inexpensive, and low in calories, and it will keep your tummy full until lunch.
It is instant oatmeal. Surprised?
One packet of plain original instant oatmeal has 100 calories and costs around $0.15 - $0.20. (depending on what brand you purchase, sales, coupons, etc). You can jazz it up with your favorite fresh fruit, spices, or just have it plain. (I add cinnamon, 1 packet of Splenda, and 1 tsp of butter.) Personalize it. Make it your own. On these cold, winter days, it really warms you from the inside out.
Instant oatmeal takes less than two minutes to heat in the microwave. That is less time than going to a fast food drive-thru and just think of all the money you will be saving! I keep a box in my office at work and while everyone else is eating a drive thru breakfast that costs around $5.00 and has around 500 calories (or more!), I enjoy my oatmeal that costs less than a quarter and has around 150 calories (after I add the butter & other good stuff).
If you ate instant oatmeal only two days a week for breakfast (instead of going to a fast food restaurant), you would save almost $40.00 a month and eliminate over 3,000 calories from your diet!
Thursday, January 2, 2014
10 Ways to Save at Publix
10 Ways to Save at Publix
I have heard several people say that Publix is so expensive that they can't afford to shop there. I am here to tell you that is just simply not true. From my perspective, Publix is one of my favorite stores to shop at because I always get awesome deals. With the deals and bargains I find, I can't afford NOT to shop there. I want to show you how to get the most out of your Publix shopping experience.
This is how to rack up those savings at Publix!
1) Weekly Ad - At least 30 BOGOs every week - Check out their weekly ad. Their weekly ad can be found online at www.publix.com, in the mail, and in the store. You can find all of their BOGOs, and deals right there. This gives you a starting point to start matching coupons with deals.
Example: General Mills Chex Mix $2.55 Bogo
Buy 2
= $2.55 for both (Savings of $2.55)
2) Coupon Savings Helper - If you don't have the time or energy, to match your coupons to the weekly ad, Publix will do it for you. Publix makes it easy to save by matching their sales with manufacturer coupons. Check out this awesome tool at http://www.publix.com/coupon/CouponHelper.do
3) Manufacturer Coupons - By all means, bring those shopping with you, whether you match the coupons yourself, have Publix do it, or use one of the multitude of deals sites (www.truecouponing.com , www.thekrazycouponlady, www.couponmom.com, www.coupon-wizards.com, etc) out there. These are found in the Sunday paper, magazines, inside or on products, online (www.coupons.com, www.redplum.com, www.smartsource.com, www.couponnetwork.com,www.enlinks.com, etc) & many other places. You can even buy them online individually or by the insert. Publix will double coupons up to $0.50 in value in every state except Florida. This doubles your savings! Use those coupons with the sale items!
Example: General Mills Chex Mix $2.55 Bogo
Buy 2
Use (2) $0.50/1 manufacurer coupon
Publix doubles itit, so it becomes $1.00 ea
= $0.55 for both bags (Savings of $4.55)
4) Publix Coupons - These can be found just about anywhere you find manufacturers coupons. You can also find these at www.publix.com. For the most savings, stack your Publix Coupons with your manufactuer coupons. Publix allows one of each to be used with each product. This is called stacking and is one of the best ways to get the most out of coupons.
Example: Alka Seltzer Plus $4.99
Use $2.00/1 Manufacturer coupon
And
Use $2.00/1 Publix coupon
= $0.99 (Savings of $4.00)
5) Flyers - Publix puts out several flyers full of coupons every two weeks. You can find these in the store. I always get mine from the service desk. If your store does not keep them at the service desk, they should be able to tell you where you can find them in your store. Match these coupons with sale items to get BIG savings.
6) Email - Best Things Happen At Home - You can register at www.publix.com to have an email sent to you every week that is full of great coupons. Just register and you will begin receiving your coupons in your inbox the following week.
7) Competitors Coupons - Publix accepts competitors coupons. They do not double them like the manufacturer coupons. You can simply call your local store to ask them which stores coupons they will accept or check out this site that has them listed for you http://truecouponing.com/publix-stores-competitor-list/
8) Digital Coupons - If you dislike fooling with paper coupons or are just looking for extra savings wherever you can find them. Check out Publix Digital Coupons. You can register for these coupons at https://publix.couponselectionpage.com/offers/all
The coupons will be electronically linked to the phone number or 10 digit code that you enter. After signing up, you can choose which coupons you would like to have. To redeem these, simply type in the 10 digit code or phone number during the check out process and the coupons that you selected that match the items you purchased will deduct automatically.
9) Penny Item day - Once a week on the day that your Publix store's sale starts they will have a certain item for a penny. To find out more information about this Penny item day, check at your store's Customer Service desk or give them a call,
10) Publix Brand Products - price compare Publix brand products to national brand products to see how you savings can add up. Publix also puts out a flyer for savings on these items frequently.
Wednesday, January 1, 2014
DIY Project - Clorox Wipes - reusable

Love Clorox wipes! Hate paying the high price for them and hate the waste. I decided to make my own natural, cheaper version that actually cleans so much better. The wipes can be washed and used over and over again. The best part is I used items I already had on hand to make them.
I used an old towel that was destined for the 'rag basket' It had definitely seen better days, but it was perfect for this. You can use an old t-shirt, old washcloths, or any type of cotton material that you are comfortable with.

I cut it up into squares about the same size as Clorox wipes cloths.


These are the ingredients I used to make my version of Clorox wipes.

Recipe:
1 cup of hot water
1/2 cup of vinegar
2 tablespoons of dishwashing liquid (I used Dawn because it was what I had on hand)
10 drops of peppermint essential oil
Mix all ingredients in measuring cup. Place cloths in container and pour liquid mixture over cloths.

Don't forget to label your container. I used pieces of old poster board to make mine. I covered the labels with packing tape to keep the labels from getting damaged. I also put the recipe on the back. This way I don't have to look it up again when I get ready to make my next batch.


The most important part to me is - how well does it do the job?
I had to put it to the test. I went to the dirtiest room in the house - the bathroom and did some cleaning. I put 'real store bought' Clorox wipes up against my DIY Clorox Wipes. Here are the results. You be the judge. I can tell you my version was thicker and cleaned easier than the name brand one.
Before

After

Before

After

Close up view of ring stain - top portion is my DIY cleaner and bottom portion of the picture is the store bought name brand.

Floors were cleaned with only my DIY Clorox wipes. These are the before and after shots. I only used 2 cloths on the entire floor.
Before

After

Worst part of the floor - Behind the toilet - Before cleaning with DIY Clorox Wipes

After cleaning with DIY Clorox wipes.

These little wipes certainly cleaned a lot better than I thought they would. The name brand store bought ones did not stand a chance up against the ones I made. If you don't believe me, try your own test and experience the results first hand.
Subscribe to:
Posts (Atom)