Showing posts with label make your own. Show all posts

Friday, January 17, 2014

Make Your Own Instant Oatmeal and Save Money!


How would you like a nice, filling breakfast for about $0.10? It is so easy!
Make your own instant oatmeal!


Use a cannister of quick oats. Measure out 1/4 cup of oats into snack size bags. Grab a pack in the morning and treat it the same way you would instant oatmeal. Add water to a bowl and pour in the quick oats. Pop it in the microwave for about 2 minutes and Voila! Your breakfast will be ready before you have had time to get dressed in the morning.
My cannister of quick oats yielded 22 bags and cost me about $2.00 including the bags. This equaled out to around $0.09 per bag


A box of instant oatmeal costs around $2.00 and has 10 pouches inside, which equals around $0.20 per pouch for the exact amount in my DIY bags.

I was very proud of myself a couple of weeks ago. I thought I was saving quite a bit of money (and even bragged in a blog about it) by having my instant oatmeal for breakfast. I thought I was doing awesome by cutting my breakfast budget down below $0.25 until, my daughter showed me this trick.
I eat oatmeal 4-5 times a week for breakfast. It's nutritious, low in calories and low in cost.
This trick of my daughter's is going to save me quite a bit over time. I just had to pass along this helpful hint.

Thursday, January 16, 2014

Laundry Tip: Make Liquid Fabric Softener Last Longer

Love the way liquid fabric softener leaves your clothes smelling? Hate the price and having to buy it every time you turn around? Have you tried skipping buying it only to have to deal with all of that static electricity? Well... that is no fun either.

I have just the solution for you! This simple tip will make any liquid fabric softener last at least 4 times longer and your clothes will still have that same wonderful smell and no static electricity.

Buy yourself a couple of packs of sponges. I found mine at Dollar General for $2.00 each. While I was at it, I went ahead and bought a new bottle of liquid fabric softener for $3.00. (I don't typically use fabric softener because the powdered laundry soap I make has Purex Crystals in it, eliminating this need for me. But, it is nice to have on hand for if/when I decide to use it.)

I cut my sponges in half length-wise and then in half across the middle, getting four small sponges out of each sponge I started with. This gave me a total of 52 small sponges.

I put all of the little sponges into a container I had on hand. I recycled an old, plastic snack tub. You can use a plastic coffee can, or any other container you would like. Plastic or glass is best.

Then, I simply poured the liquid fabric softener over the sponges until the liquid fabric softener was about 2 inches from the top. I was only able to pour about 3/4 of my new bottle of liquid fabric softener into my container. This gives me more to refill my container as I use it up.

 Next, you will need to label your container. I always put the name of what is in the container and the date on mine so I can see just how long it lasts. 

Directions for use:
When you start a load of laundry, use one small sponge per load. Squeeze out excess liquid and place in your washing machine with your dirty laundry. When the washing machine finishes, put laundry AND sponge into dryer. After dryer finishes, place small sponge back into the container to re-use.

Eventually, the liquid fabric softener will be used, just refill container with fabric softener remaining in original bottle. You will be so surprised at how much longer this will make one bottle of fabric softener last!

My bottle stated that it was a 40 load bottle (which would last me about a month if I followed the instructions on the bottle). I only used 3/4 of the bottle filling my container. I had 52 sponges to start off. They will be recycled over and over again. I am predicting this one 40 load bottle will last me around 6 months, if I wash on average one - two loads of clothes per day.

Tuesday, January 7, 2014

DIY Citrus Rosemary All Purpose Cleaner

Do you need a great all purpose cleaner to use around your house? I have an all natural cleaner for you. It only has 3 ingredients so it is simple and easy to make. You probably have all of the ingredients on hand, so why not give it a try?

Start off with oranges. I still had plenty on hand from the holidays. Instead of throwing those peels away, I had the family save them. I put those in a recycled plastic mayonnaise jar.


Orange peelings contain citrus essential oil which is a natural solvent. It will cut through grease and grime and is great to clean those really tough jobs, like the stove top.

I poured vinegar over the peels and this is what it looked like.


Vinegar is a natural bi-product of fruit, vegetables and grains. It kills bacteria, mold, and germ causing viruses.

I added a few sprigs of dried rosemary.


Rosemary is a natural disinfectant and a natural air freshener. As a bonus, the aroma is known to have properties that stimulates brain function that will aid in mental clarity and increased memory. It is also a stress reliever and promotes relaxation.

When the rosemary was added to the orange peel/vinegar mixture it looked like this.


The Citrus Rosemary Cleaner starter is now complete. All it needs is a label with date and time to wait.


Place the jar in some place out of the way. Let it steep for about 30 days. Shake the jar every few days to stir contents. Then, strain the liquid and pour into a spay bottle. Place rosemary and peelings back in the jar. Fill with vinegar to start your next batch of cleaner.

This cleaner is non-toxic, all natural, biodegradable, and environmentally friendly.

Sunday, January 5, 2014

DIY Laundry Pods

Do you go to a laundromat  to do your laundry and hate carrying big bottles of soap and fabric softener? Or maybe you are going to be traveling and need to do laundry while you are away. I have a solution for you. Make these laundry pods and make your life a bit easier. These are simple to make and easy to carry.

They only have five ingredients and odds are you have most of it in your house now

Ingredients:
3 cups of Arm & Hammer Super Washing Soda
1 cup of Fels Naptha Bar Soap - shredded
4 tablespoons of Epsom Salt
6 tablespoons of hydrogen peroxide
1/2 cup of vinegar

Directions:

Add 1 cup of shredded Fels Naptha bar soap to a mixing bowl.


Then, add 3 cups of Arm & Hammer Super Washing Soda.


Next, add 4 tablespoons of Epsom Salt.


Then you will need to add 6 tablespoons of hydrogen peroxide. It will fizz and bubble. This is normal. Next, add 1/2 cup of vinegar and stir.


The mixture should have the texture of slightly wet sand.

Use a tablespoon measuring spoon to make scoops. Pull against side of bowl to remove excess from spoon. Place on a parchment covered tray or cookie sheet.


Allow pods to dry over night. Then, store in an airtight container. Will make about 40 laundry pods. Each pod costs only pennies to make and is safe in HE machines. No fabric softener is needed when you use these pods.

DIY Laundry Soap Powdered

Tired of paying high prices for name brand laundry soap? Not me. I have been making my own for years. This is my favorite DIY powdered laundry soap. It makes enough to last for months and costs less than $21.00 total. You have to try this one!


You will need this for your ingredients:
1)   4 pound box of Borax ($3.38)
1)   3 pound 7 ounce box of Arm & Hammer Super Washing Soda ($3.24)
1)   3 pound container of Oxi Clean ($2.73)
2)   14.1 ounce bars of Zote Soap ($0.97 each)
1)   4 pound box of Arm & Hammer Baking Soda ($2.24)
1)   55 ounce bottle of Crystals Fabric Softener ($8.96)
All ingredients were purchased at Walmart in the laundry aisle.
The cost for everything was $20.55 before tax.

Directions:
Grate the Zote Soap. I used a food processor.  You can grate it by hand, or slice it and put it in the microwave for about 30 seconds and crumble it. Do it anyway you want, I just found the food processor to be the quickest and easiest way. You want it to look like pink shredded cheese.
This is what it should look like after grating.


Next you will want to layer your ingredients. Think of making lasagna. Once you have used all your ingredients in the layering process, it will look like this.

Now it is time to mix all of the ingredients. You can do it the old fashioned way with a big spoon and stir until you feel like your arm will fall off.


Or you can do it the easy way by pouring it into a garbage bag and rolling it back and forth.


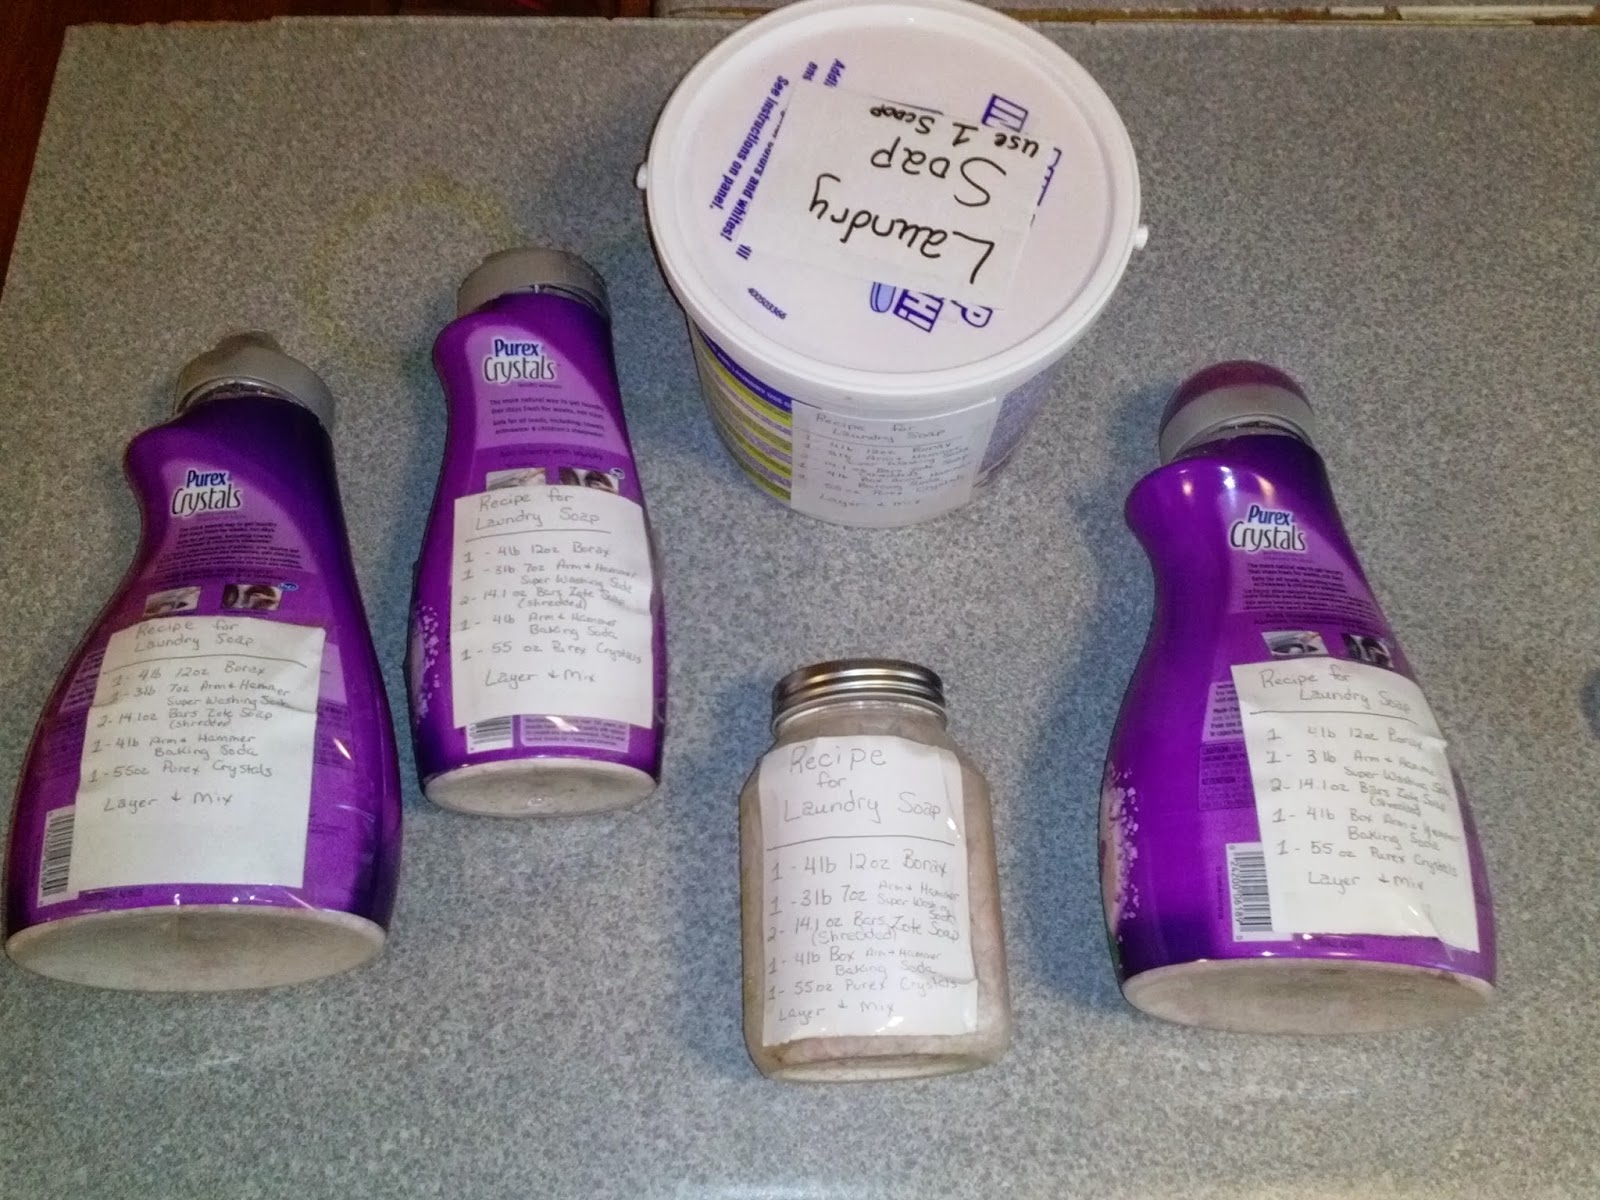
When you get it mixed well, fill your containers. I try to recycle my old ones by refilling them. I label the front with 'Laundry Soap' with directions on how to use.


I make a label with the ingredients for the back. This way, I know exactly how much and what types of ingredients are in it so I do not have to hunt for the recipe when I get ready to make more.


Now, how much to use per load? It only takes 2 tablespoons per load. I use the scoop that came in my oxi clean container. You can also use the lid from the Purex Crystals bottle. Fill to the middle line on the  bottle lid.
You will be surprised by how much this makes and by how little it takes per load. It should last 6 - 12 months depending on how big your family is and how much laundry is done each day in your home.

It is safe to use on HE machines.

To make it easier and more fun to make, get a laundry soap making buddy. In my case, I went to Mom's and we made 2 batches. This way she had one and I had one to take home. We spent the day together AND got something done! Yay us!

Wednesday, January 1, 2014

DIY Project - Clorox Wipes - reusable


Love Clorox wipes! Hate paying the high price for them and hate the waste. I decided to make my own natural, cheaper version that actually cleans so much better. The wipes can be washed and used over and over again. The best part is I used items I already had on hand to make them.

I used an old towel that was destined for the 'rag basket' It had definitely seen better days, but it was perfect for this. You can use an old t-shirt, old washcloths, or any type of cotton material that you are comfortable with.


I cut it up into squares about the same size as Clorox wipes cloths.
I was able to get over 30 square cloths out of this one towel.

These are the ingredients I used to make my version of Clorox wipes.
The Domino's Sugar container is an empty container I am recycling to put my finished product in. I did not want to use a 'baby wipes' container because we have a toddler ( my granddaughter) running around this house getting into stuff. Plus, I did not want to take the chance on getting wipes confused. I did not use a glass container because of my granddaughter too. You feel free to use any type of container that makes you happy.

Recipe:
1 cup of hot water
1/2 cup of vinegar
2 tablespoons of dishwashing liquid (I used Dawn because it was what I had on hand)
10 drops of peppermint essential oil

Mix all ingredients in measuring cup. Place cloths in container and pour liquid mixture over cloths.
Put lid on and shake to saturate all cloths. In this instance I made a double batch of the cleaning mixture so all of my cloths would be saturated.
Don't forget to label your container. I used pieces of old poster board to make mine. I covered the labels with packing tape to keep the labels from getting damaged. I also put the recipe on the back. This way I don't have to look it up again when I get ready to make my next batch.

 
  You can fancy your container up a bit if you are into that kind of thing.


The most important part to me is - how well does it do the job?
I had to put it to the test. I went to the dirtiest room in the house - the bathroom and did some cleaning.  I put 'real store bought' Clorox wipes up against my DIY Clorox Wipes. Here are the results. You be the judge. I can tell you my version was thicker and cleaned easier than the name brand one.
 
Before
 
After


Before
 
After

 
Close up view of ring stain - top portion is my DIY cleaner and bottom portion of the picture is the store bought name brand.


Floors were cleaned with only my DIY Clorox wipes. These are the before and after shots. I only used 2 cloths on the entire floor.
 
 
Before
 
After
 
 
Worst part of the floor - Behind the toilet - Before cleaning with DIY Clorox Wipes
 
After cleaning with DIY Clorox wipes.
 
 
These little wipes certainly cleaned a lot better than I thought they would. The name brand store bought ones did not stand a chance up against the ones I made. If you don't believe me, try your own test and experience the results first hand.